
| 일 | 월 | 화 | 수 | 목 | 금 | 토 |
|---|---|---|---|---|---|---|
| 1 | 2 | 3 | 4 | 5 | 6 | |
| 7 | 8 | 9 | 10 | 11 | 12 | 13 |
| 14 | 15 | 16 | 17 | 18 | 19 | 20 |
| 21 | 22 | 23 | 24 | 25 | 26 | 27 |
| 28 | 29 | 30 |
- mybatis
- 페이징
- Spring
- DI
- @ComponentScan
- Spring Container
- JPA
- AWS
- docker
- JdbcTemplate
- JPQL
- JWT
- 스프링 부트
- docker compose
- 지연 로딩
- Web
- MSA
- 쿠버네티스
- dockerhub
- kafka
- DLQ
- redis
- CORS
- Dead Letter Queue
- 컨테이너
- Routing Key
- @Transactional
- 서블릿 컨테이너
- securitycontextholderfilter
- Spring Data JPA
- Today
- Total
look-forest
[JPA, Spring Security 기반 웹 애플리케이션 개발] 지식, 이슈 정리 본문
public void login(Account account) {
    UsernamePasswordAuthenticationToken authenticationToken = new UsernamePasswordAuthenticationToken(
            new UserAccount(account),
            account.getPassword(),
            List.of(new SimpleGrantedAuthority("ROLE_USER")));
    SecurityContextHolder.getContext().setAuthentication(authenticationToken);

    // HttpSession에 SecurityContext를 저장하여 이후 요청에서도 인증 상태가 유지되도록 함
    HttpSession session = ((ServletRequestAttributes) Objects.requireNonNull(RequestContextHolder.getRequestAttributes())).getRequest()
            .getSession();
    session.setAttribute(HttpSessionSecurityContextRepository.SPRING_SECURITY_CONTEXT_KEY, SecurityContextHolder.getContext());
}
JPA와 Spring Security 기반 웹 애플리케이션 개발 과정에서 배운 점을 정리하려고 한다.
참고로 오래된 강의라 강의 방식을 그대로 따라하진 않고, 특히 Security의 경우 최신 버전을 기준으로 개발했다.
회원 가입
인증 메일 확인 프로세스
회원가입 시 이메일 정보는 정확할 필요가 있으므로, 인증 메일을 보내고 확인 후 가입시키도록 한다.
임시 회원 가입
0. 회원 가입 정보 검증
1. 회원 정보 저장 시 이메일 인증 토큰 생성(UUID)
2. 인증 메일 발송(인증 토큰, 이메일 포함)
완료 후 고객이 메일에 접속해 인증 클릭 시
1. 요청 파라미터의 인증 토큰과 회원 정보의 인증 토큰이 같으면 인증한 사용자 -> 회원 가입 완료 처리
2. 실패 시 오류 메시지
회원 가입 완료 후 자동 로그인 시 Spring Security 최신 버전 이슈
SSR 에서 세션 기반 인증할 경우 SecurityContext가 반영되지 않는 문제
아래와 같이 회원 가입 후, 별도의 시큐리티 필터를 거치지 않고 직접 SecurityContext에 Authentication 객체를 넣어줬다.
public void login(Account account) {
    UsernamePasswordAuthenticationToken authenticationToken = new UsernamePasswordAuthenticationToken(
            account.getNickname(),
            account.getPassword(),
            List.of(new SimpleGrantedAuthority("ROLE_USER")));
    SecurityContextHolder.getContext().setAuthentication(authenticationToken);
그런데 테스트 코드의 .andExpect(authenticated())에서 Authentication이 null이라고 실패했다.
위 테스트 코드를 디버깅해보니, SecurityContextRepository에 저장된 SecurityContext를 읽어오더라.
그런데 최신 버전에서 SecurityContextPersistenceFilter가 deprecated되고 SecurityContextHolderFilter 로 변경되면서, 응답 종료 시 SecurityContext를 비우고 SecurityContextRepository에 변경 사항을 저장하지 않는 것이다.
그래서 직접 SecurityContextRepository 에 SecurityContext를 저장하거나, Session에 SecurityContext를 넣어줬더니 오류가 해결되었다.
public void login(Account account) {
    UsernamePasswordAuthenticationToken authenticationToken = new UsernamePasswordAuthenticationToken(
            new UserAccount(account),
            account.getPassword(),
            List.of(new SimpleGrantedAuthority("ROLE_USER")));
    SecurityContextHolder.getContext().setAuthentication(authenticationToken);

    // HttpSession에 SecurityContext를 저장하여 이후 요청에서도 인증 상태가 유지되도록 함
    HttpSession session = ((ServletRequestAttributes) Objects.requireNonNull(RequestContextHolder.getRequestAttributes())).getRequest()
            .getSession();
    session.setAttribute(HttpSessionSecurityContextRepository.SPRING_SECURITY_CONTEXT_KEY, SecurityContextHolder.getContext());
}
참고로 디버깅 시에 값을 검색할 수 있다는 꿀팁을 알게된 것이 큰 수확이었다 ㅎㅎ

로그인 로그아웃
SSR 방식에서 로그인 로그아웃 구현시에는, login 페이지만 새로 정의하고
로그인, 로그아웃 프로세는 Spring Security가 제공하는 핸들러를 그대로 사용하면 된다. 굉장히 간단하게..
다만 로그인 시 UserDetailsService를 구현해줘야 하는 점 있지 말자.
http
        .formLogin(login -> login
                .loginPage("/login") //페이지만 커스텀하고 요청 처리 핸들러는 Security 제공 사용 (userDetailsService 구현 필)
                .permitAll());

http
        .logout(logout -> logout
                .logoutSuccessUrl("/"));
시큐리티 테스트
단순히 인증 정보가 필요할 때는 @WithMockUser
실제로 DB에 있는 사용자 정보를 조회해야할 때는 @WithUserDetails (UserDetailsService로 조회)
시큐리티 컨텍스트 자체를 조작하고 싶을 때는 @WithSecurityContext를 사용하면 된다.
@WithSecurityContext를 사용하면 DB에 회원정보를 초기화하는 로직까지 녹일 수 있다!
@Retention(RetentionPolicy.RUNTIME)
@WithSecurityContext(factory = WithAccountSecurityContextFactory.class)
public @interface WithAccount {
    String value();
}

@RequiredArgsConstructor
public class WithAccountSecurityContextFactory implements WithSecurityContextFactory<WithAccount> {

    private final AccountService accountService;

    @Override
    public SecurityContext createSecurityContext(WithAccount withAccount) {
        String nickname = withAccount.value();

        //유저를 만들고 DB에 저장
        SignUpForm signUpForm = new SignUpForm();
        signUpForm.setNickname(nickname);
        signUpForm.setEmail(nickname.concat("@email.com"));
        signUpForm.setPassword("password");
        accountService.processNewAccount(signUpForm);

        //DB에서 조회
        UserDetails principal = accountService.loadUserByUsername(nickname);
        Authentication authentication = new UsernamePasswordAuthenticationToken(principal, principal.getPassword(), principal.getAuthorities());
        SecurityContext context = SecurityContextHolder.createEmptyContext();
        context.setAuthentication(authentication);
        return context;
    }
}
사용 예시
@AfterEach
void afterEach() {
accountRepository.deleteAll(); //@WithAccount에서 저장하므로 매번 지워줘야 한다.
}
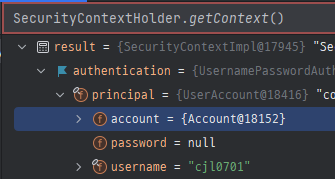
@WithAccount("cjl0701")
@DisplayName("프로필 수정하기 - 입력값 정상")
@Test
void updateProfile() throws Exception {
String bio = "짧은 소개를 수정하는 경우";
mockMvc.perform(post(SettingsController.SETTINGS_PROFILE_URL)
.param("bio", bio)
.with(csrf()))
.andExpect(status().is3xxRedirection())
.andExpect(redirectedUrl(SettingsController.SETTINGS_PROFILE_URL))
.andExpect(flash().attributeExists("message"));
Account account = accountRepository.findByNickname("cjl0701");
assertEquals(bio, account.getBio());
}
프론트엔드 라이브러리 설정
NPM을 이용해 프론트엔드 라이브러리를 다운로드했다. 이 때 설정할 것들이 많았다.
스프링 부트에서는 src/main/resources/static 디렉토리 이하는 정적 리소스로 제공한다.
해당 경로로 이동해서 npm install로 라이브러리를 다운받으면 package.json에 기록된다.
"dependencies": {
  "bootstrap": "^4.4.1",
  "cropper": "^4.1.0",
  "font-awesome": "^4.7.0",
  "jdenticon": "^3.3.0",
  "jquery": "^3.4.1",
  "jquery-cropper": "^1.0.2"
}
static 디렉토리 아래에 package.json를 사용해서 프론트엔드 라이브러리를 제공하는 방식을 쓸 것이므로,
build.gradle을 빌드할 때 static 디렉토리 아래에 있는 package.json도 빌드하도록 설정해야 한다.
빌드해서 생성되는 파일이나 디렉토리는 .gitignore 파일에 명시하여 버전관리에서 제외하고,
/node_modules/** 요청에는 시큐리티 필터를 적용하지 않도록 설정해야 한다.
@CurrentUser에 변경된 계정 정보가 반영되지 않는 문제
@GetMapping(SETTINGS_NOTIFICATIONS_URL)
public String updateNotificationsForm(@CurrentUser Account account, Model model) {
    model.addAttribute(account);
    model.addAttribute(new Notifications(account));
    return SETTINGS__NOTIFICATIONS_VIEW_NAME;
}

@PostMapping(SETTINGS_NOTIFICATIONS_URL)
public String updateNotifications(@CurrentUser Account account, @Valid Notifications notifications, Errors errors,
                                  Model model, RedirectAttributes redirectAttributes) {
    if (errors.hasErrors()) {
        model.addAttribute(account);
        return SETTINGS__NOTIFICATIONS_VIEW_NAME;
    }

    accountService.updateNotifications(account, notifications);
    redirectAttributes.addFlashAttribute("message", "알림 설정을 변경했습니다.");
    return "redirect:" + SETTINGS_NOTIFICATIONS_URL;
}
회원 정보를 수정한 후, Account에 변경된 내용이 반영이 되지 않는다.
왜 일까? JPA 로그를 보면 dirty check로 update 쿼리는 수행되었다.
그렇다면 파라미터인 @CurrentUser Account account에 변경 사항이 반영되지 않는 것 같다.
우선 @CurrentUser 는 @AuthenticationPrincipal 를 커스텀한 애노테이션이기 때문에, @AuthenticationPrincipal 의 동작 원리 부터 살펴봤다.
@AuthenticationPrincipal 의 동작 원리
우선 해당 애노테이션의 document를 보면 개요가 아래와 같다.
Annotation that is used to resolve Authentication.getPrincipal() to a method argument.
즉, Authentication 객체에서 principle을 꺼내주는 역할이고
실질적으로 이 애노테이션을 처리하는 Argument Resolver는 AuthenticationPrincipalArgumentResolver 이다.
Argument Resolver 가 동작하는 시점에 SecurityContext에서 Authentication을 조회한다.
Authentication authentication = this.securityContextHolderStrategy.getContext().getAuthentication();
SecurityContextHolder에 Authentication이 set되는 시점
그렇다면 SecurityContextHolder에 Authentication이 set되는 시점을 봐야할 것 같다.
최초 update 요청 시 SecurityContextHolderFilter에서 SecurityContext load.
update 성공 후 redirect 시 SecurityContextHolderFilter에서 SecurityContext load.
세션에서 Authentication을 읽어오는데, 세션에 변경된 Authentication이 반영되어 있지 않기 때문에
결과적으로 @AuthenticationPrincipal에 변경 사항이 반영되지 않는 것이다.
public class HttpSessionSecurityContextRepository implements SecurityContextRepository {

	public DeferredSecurityContext loadDeferredContext(HttpServletRequest request) {
		Supplier<SecurityContext> supplier = () -> this.readSecurityContextFromSession(request.getSession(false));
		return new SupplierDeferredSecurityContext(supplier, this.securityContextHolderStrategy);
	}

}
해결 - 명시적 반영
SecurityContextHolderFilter는 요청 끝에 SecurityContext를 저장하지 않기 때문에 (saveContext() 생략됨)
변경 사항을 명시적으로 반영해줘야 한다.
Authenticaion을 바꾸든, 세션에 저장된 값을 바꾸든 기존에 어떻게 생성되고 저장되는지 알아야 실마리가 보일 것 같다.
Authenticaion은 언제 생성되고 세션에 저장되는가?
UsernamePasswordAuthenticationFilter부터 추적해보니, loadUserByUsername을 거쳐 반환한 UserDetails 객체를 Principal로 하여 생성된다. 그리고 SecurityContext에 저장된 뒤,
HttpSessionSecurityContextRepository에 아래와 같이 세션에 저장하고 있다.
private void setContextInSession(SecurityContext context, HttpSession session) {
    if (session != null)
        session.setAttribute(this.springSecurityContextKey, context);
}
Authentication 객체를 만들어 SecurityContext에 넣고, 세션에 반영하는 부분이 login 메소드와 동일하여 해당 메소드를 그대로 호출하여 처리했다.
ModelMapper 반영 시 오류가 발생
ModelMapper는 객체의 프로퍼티를 다른 객체의 프로퍼티로 맵핑해주는 유틸리티이다.
아래와 같이 DTO에 적용 시 오류가 발생했다.
public void updateNotifications(Account account, @Valid Notifications notifications) {
	Account accountPS = accountRepository.findByEmail(account.getEmail());
	modelMapper.map(profile, accountPS);
//        accountPS.setStudyCreatedByWeb(notifications.isStudyCreatedByWeb());
//        accountPS.setStudyCreatedByEmail(notifications.isStudyCreatedByEmail());
//        accountPS.setStudyUpdatedByWeb(notifications.isStudyUpdatedByWeb());
//        accountPS.setStudyUpdatedByEmail(notifications.isStudyUpdatedByEmail());
//        accountPS.setStudyEnrollmentResultByEmail(notifications.isStudyEnrollmentResultByEmail());
//        accountPS.setStudyEnrollmentResultByWeb(notifications.isStudyEnrollmentResultByWeb());
}
아래와 같이 ModelMapper가 이름이 복잡해서 Account의 계층구조를 잘 못찾는 것이다.
The destination property com.studygroup.studygroup.domain.Account.setEmail() matches multiple source property hierarchies:
com.studygroup.studygroup.settings.Notifications.isStudyCreatedByEmail() com.studygroup.studygroup.settings.Notifications.isStudyEnrollmentResultByEmail() com.studygroup.studygroup.settings.Notifications.isStudyUpdatedByEmail()
이는 ModelMapper의 매핑 룰 기본 설정 값이 camel case나 under score 등 모든 네이밍 룰을 지원하기 때문이다.
우리는 camel case를 사용하므로, 아래와 같이 네이밍 룰에 under score를 적용하도록 하면
camel case로 객체 계층 구조를 찾지 않고 하나의 프로퍼티로 인식하게 될 것이다.
@Bean
public ModelMapper modelMapper() {
    ModelMapper modelMapper = new ModelMapper();
    modelMapper.getConfiguration()
            .setDestinationNameTokenizer(NameTokenizers.UNDERSCORE)
            .setSourceNameTokenizer(NameTokenizers.UNDERSCORE);
    return modelMapper;
}
Ajax, Axios 사용 시 403 Forbidden 에러
POST 요청을 보낼 경우에 항상 CSRF 토큰를 넣어줘야해서 오류가 발생하는 것이다.
타임리프를 사용하는 경우 아래와 같이 javascript inline으로 내추럴 템플릿(javascript)을 깨뜨리지 않고 주석으로 model에 있는 값을 넣을 수 있다.
<script type="application/javascript" th:inline="javascript">
    $(function() {
        var csrfToken = /*[[${_csrf.token}]]*/ null;
        var csrfHeader = /*[[${_csrf.headerName}]]*/ null;
        $(document).ajaxSend(function (e, xhr, options) {
            xhr.setRequestHeader(csrfHeader, csrfToken);
        });
    });
</script>

<script type="application/javascript">
    $(function () {
        function tagRequest(url, tagTitle) {
            $.ajax({
                dataType: "json",
                autocomplete: {
                    enabled: true,
                    rightKey: true,
                },
                contentType: "application/json; charset=utf-8",
                method: "POST",
                url: "/settings/tags" + url,
                data: JSON.stringify({'tagTitle': tagTitle})
            }).done(function (data, status) {
                console.log(`${data} and status is ${status}`);
            });
        }'
        ...
 </script>
자동 완성
태그에 자동 완성 기능을 넣는다고 생각해보자.
태그라는 도메인 객체가 따로 저장되고, 회원 정보에 태그 정보가 연관관계 매핑이 된다.
회원이 태그를 신규 등록하면 태그가 저장되고, 연관관계가 맺어지는 것이다.
삭제할 경우 태그 자체가 삭제되는 것이 아니고, 연관관계에서 지우는 것이다.
저장되어 있는 태그는 자동완성에 활용된다. 태그 전체 리스트를 뷰에 던지고, 뷰에서 그 값을 파싱해서 들고 있으면 된다.
테스트 코드에서 Lazy 로딩 오류
요청 자체는 트랜잭션 내에 동작하지만, 이후 검증 부분에서는 트랜잭션 범위 외에 있으므로 detached 상태이다.
그래서 lazy 로딩이 안되는데, 테스트 코드에 @Transactional을 붙이면 놀랍게도 같은 트랜잭션으로 묶어준다..!
@Transactional //lazy 로딩이 적용된다.
@WithAccount("cjl0701")
@DisplayName("계정에 태그 추가")
@Test
void addTag() throws Exception {
    TagForm tagForm = new TagForm();
    tagForm.setTagTitle("newTag");

    mockMvc.perform(post(SettingsController.SETTINGS_TAGS_URL + "/add")
                    .contentType(MediaType.APPLICATION_JSON)
                    .content(objectMapper.writeValueAsString(tagForm))
                    .with(csrf()))
            .andExpect(status().isOk());

    Tag newTag = tagRepository.findByTitle(tagForm.getTagTitle()).orElseThrow();
    assertNotNull(newTag);
    assertTrue(accountRepository.findByNickname("cjl0701").getTags().contains(newTag)); //LazyInitializationException 발생
}
화이트 리스트 만들기
데이터를 먼저 밀어넣고, 입력된 데이터 중에서만 선택할 수록 있도록 한다.
1. resources 디렉토리에 읽을 데이터 파일을 넣는다.
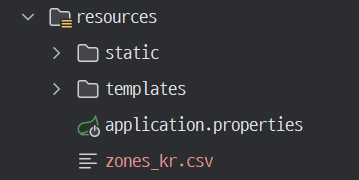
이것을 Resource 객체로 받을 수 있다.(spring core)
2. Repository 빈 생성 후 데이터를 밀어 넣는다.
@Service
@Transactional
@RequiredArgsConstructor
public class ZoneService {

    private final ZoneRepository zoneRepository;

    @PostConstruct //빈 생성 후 실행됨
    public void initZoneData() throws IOException {
        if(zoneRepository.count() == 0){
            Resource resource = new ClassPathResource("zones_kr.csv");
            List<Zone> zoneList = Files.readAllLines(resource.getFile().toPath(), StandardCharsets.UTF_8).stream()
                    .map(line -> {
                        String[] split = line.split(",");
                        return Zone.builder()
                                .city(split[0])
                                .localNameOfCity(split[1])
                                .province(split[2])
                                .build();
                    })
                    .toList();
            zoneRepository.saveAll(zoneList);
        }
    }
}
참고 자료 & 이미지 출처
스프링과 JPA 기반 웹 애플리케이션 개발 (백기선 님)
