
| 일 | 월 | 화 | 수 | 목 | 금 | 토 |
|---|---|---|---|---|---|---|
| 1 | 2 | 3 | 4 | 5 | 6 | |
| 7 | 8 | 9 | 10 | 11 | 12 | 13 |
| 14 | 15 | 16 | 17 | 18 | 19 | 20 |
| 21 | 22 | 23 | 24 | 25 | 26 | 27 |
| 28 | 29 | 30 |
- Spring
- @Transactional
- JdbcTemplate
- 지연 로딩
- 쿠버네티스
- JPA
- MSA
- Web
- JWT
- securitycontextholderfilter
- @ComponentScan
- 서블릿 컨테이너
- Spring Data JPA
- kafka
- Routing Key
- CORS
- Dead Letter Queue
- Spring Container
- 페이징
- DI
- docker
- dockerhub
- 스프링 부트
- JPQL
- mybatis
- DLQ
- docker compose
- 컨테이너
- redis
- AWS
- Today
- Total
look-forest
스프링 OAuth2 Client (세션 방식, SSR 구조) 본문
스프링 OAuth2 Client (세션 방식, SSR 구조)
studyHub 2024. 11. 14. 22:44OAuth2.0 클라이언트와 스프링 시큐리티 6 프레임워크를 활용하여,
신뢰할 수 있는 외부 사이트(구글, 네이버)로 부터 인증을 받고, 전달 받은 유저 데이터를 활용하여 세션을 만들고 인가를 진행하는 방법 학습.
여러 인증 방식이 있지만, 본 프로젝트에서는 Authorization Code Grant Type 기준으로 진행한다.
필수 의존성
- Spring Security
- OAuth2 Client
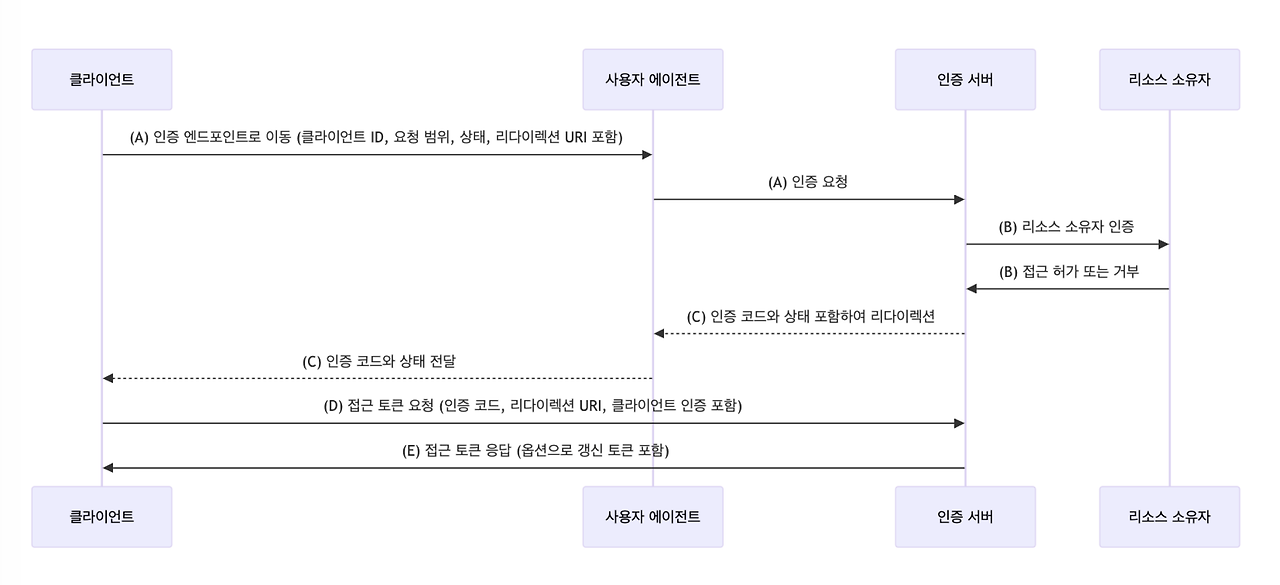
OAuth2 구성 요소와 인증 방식
- Resource Owner : 사용자
보호된 리소스에 대한 접근 권한을 부여할 수 있는 주체 - Client : 우리 시스템
Resource Owner를 대신하여 보호된 리소스 요청을 수행하여, Resource Owner의 승인을 받은 애플리케이션 - Authorization Server : 네이버/구글
자원 소유자를 인증하고 권한을 얻은 후 클라이언트에 접근 토큰을 발급하는 서버 - Resource Server : 네이버/구글
보호된 리소스를 호스팅하며, 접근 토큰을 사용하여 보호된 리소스 요청을 수락하고 응답할 수 있는 서버
OAuth2 인증 방식 종류는 4가지가 있으나, Authorization Code Grant 방식이 가장 일반적이고 보안성이 높다.
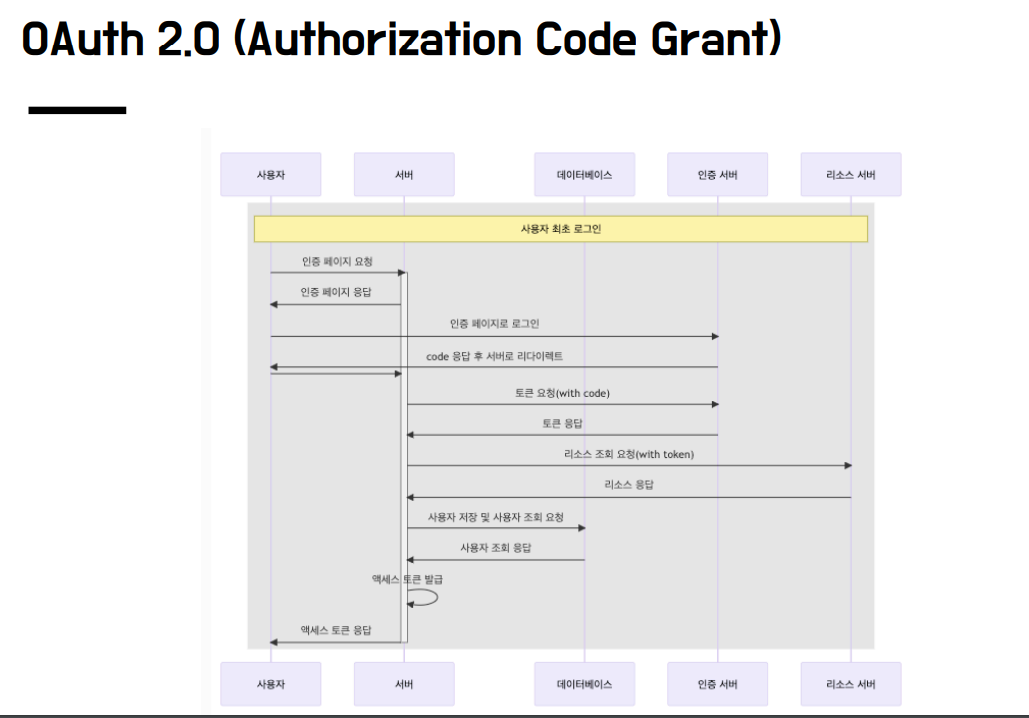
OAuth2.0 인증 구조 및 흐름
OAuth2 Code Grant 방식의 동작 순서
- 로그인 페이지
- 성공 후 코드 발급 (redirect_url)
- 코드를 통해 Access 토큰 요청
- Access 토큰 발급 완료
- Access 토큰을 통해 유저 정보 요청
- 유저 정보 획득 완료

1. 로그인 버튼을 누르면 구글/네이버로 리다이렉트하여 인증 시도
OAuth2AuthorizationRequestRedirectFilter
로그인 페이지에서 : /oauth2/authorization/서비스
<h1>Custom login page</h1>
<hr>
<a href="/oauth2/authorization/naver">naver login</a><br>
<a href="/oauth2/authorization/google">google login</a>
로그인 페이지에서 GET : /oauth2/authorization/서비스 경로로 요청을 할 경우 OAuth2 의존성에 의해 OAuth2AuthorizationRequestRedirectFilter에서 해당 요청을 받고, 서비스의 로그인 URI로 요청을 리디렉션 시킨다.

2. 로그인 성공 후 리다이렉트하여 유저 정보 요청
인증 서버에서 로그인을 성공한 뒤 우리 서버측으로 발급되는 CODE를 획득하고, CODE를 통해 Access 토큰과 User 정보를 획득하는 OAuth2LoginAuthenticationProvider를 호출하는 일련의 과정을 시작
OAuth2LoginAuthenticationFilter
로그인 성공 redirect_uri 필터 : /login/oauth2/code/서비스명
로그인 성공 후 redirect_uri 경로로 호출되어, 발급된 code를 통해 OAuth2LoginAuthenticationProvider를 호출.

OAuth2LoginAuthenticationProvider
전달 받은 정보를 통해 외부 인증 서버를 호출하여 Access 토큰을 발급 받는다.
이후 Access 토큰을 통해 외부 리소스 서버에서 유저 정보를 OAuth2UserService에서 응답 파싱해 user 정보 생성

※ 각각의 필터가 동작하는 주소 (관습)
- OAuth2AuthorizationRequestRedirectFilter
/oauth2/authorization/인증서비스명 - OAuth2LoginAuthenticationFilter : 외부 인증 서버에 설정할 redirect_uri
/login/oauth2/code/인증서비스명
왜 이렇게 복잡한 과정을 거칠까?
왜 처음 로그인 시도 후 성공한 뒤에 유저 정보를 바로 주지않고 code 값을 주는 걸까?
1. 로그인 생성 후 데이터가 URI 파라미터로 넘어오기 때문에 직접 넘기기가 위험하다.
그래서 code를 보내고 데이터 요청시 HTTP body에 토큰을 담아서 안전하게 받는다.
(302 리다이텍트는 헤더나 바디에 값을 넣어서 전달 불가하므로 URI 파라미터 전달 밖에 방법이 없다.
TLS 인증서를 통한 HTTPS 통신시 body에 담긴 데이터는 탈취 난이도가 굉장히 높아 안전하다.)
2. 덧붙여, secret key가 노출되지 않도록 하기 위함이라고 한다.
이는 서버와 클라이언트가 분리된 애플리케이션 구조에서 유용한데, 클라이언트에 secret key를 저장하지 않아도 된다.
민감한 토큰 발급 과정은 클라이언트가 아닌 서버 측에서 처리하는 것이다.
구현 준비
구현 범위
OAuth2 Client 의존성을 추가한 경우 저 많은 기능을 다 구현하는 것이 아니라, application.properties에 변수 설정만 하면
OAuth2AuthorizationRequestRedirectFilter → OAuth2LoginAuthenticationFilter → OAuth2LoginAuthenticationProvider
까지의 과정을 추가 설정하지 않아도 자동으로 진행한다. (redirectUrl, id, secret, scope 등 다 있으므로)
따라서 UserDetailsService와 UserDetails만 구현하면 된다.
소셜 로그인 신청
네이버 디벨로퍼스 등에서 로그인 API를 신청
- 서비스 URL과 Callback URL (로그인 성공 리다이렉트. code를 날려줌)을 등록하고, 필요한 사용자 정보 제공을 선택
- 발급받은 ClientID와 Client Secret를 스프링 부트 application.properties OAuth2 변수에 설정
OAuth2 소셜 로그인을 위한 변수 설정
위의 각각의 로직이 동작을 하기 위해서는 서비스별로 특정 값이 필요하기 때문에 변수 설정이 필요하다.
# application.properties
#registration
spring.security.oauth2.client.registration.서비스명.client-name=서비스명
spring.security.oauth2.client.registration.서비스명.client-id=서비스에서 발급 받은 아이디
spring.security.oauth2.client.registration.서비스명.client-secret=서비스에서 발급 받은 비밀번호
spring.security.oauth2.client.registration.서비스명.redirect-uri=서비스에 등록한 우리쪽 로그인 성공 URI
spring.security.oauth2.client.registration.서비스명.authorization-grant-type=authorization_code
spring.security.oauth2.client.registration.서비스명.scope=리소스 서버에서 가져올 데이터 범위

#provider
spring.security.oauth2.client.provider.서비스명.authorization-uri=서비스 로그인 창 주소
spring.security.oauth2.client.provider.서비스명.token-uri=토큰 발급 서버 주소
spring.security.oauth2.client.provider.서비스명.user-info-uri=사용자 정보 획득 주소
spring.security.oauth2.client.provider.서비스명.user-name-attribute=응답 데이터 변수- registration : 외부 서비스에서 우리 서비스를 특정하기 위해 등록하는 정보여서 등록이 필수적
- provider : 소셜 로그인 서비스별로 정해진 값이 존재하며 OAuth2 클라이언트 의존성이 내부적으로 데이터를 가지고 있다. (구글, Okta, 페이스북, 깃허브, 등 유명 서비스만)
구현
1. SecurityConfig 등록
oauth2Login으로 설정해야 한다. (oauth2Client로 설정하면 위 필터를 모두 구현해야 한다. 나중에 알아보자.)
@Bean
public SecurityFilterChain securityFilterChain(HttpSecurity http) throws Exception {

    http
            .oauth2Login(Customizer.withDefaults());
2. OAuth2UserService 응답 받기
사용자가 인증 서버에서 로그인 후 내 서비스로 리다이렉트 시켜줄 때 code 값을 주고,
우리는 그 code 값으로 인증 서버에 access 토큰을 발급 받는다.
그 후 access 토큰으로 리소스 서버로부터 유저 정보를 획득해오는데,
이 획득한 정보를 처리할 UserDetailsService가 필요하다.
이 서비스 클래스를 만들고 설정에 등록한다.
public class SecurityConfig {

    private final CustomOAuth2UserService customOAuth2UserService;

    @Bean
    public SecurityFilterChain securityFilterChain(HttpSecurity http) throws Exception {

        http
                .oauth2Login(oauth2 -> oauth2
                        .userInfoEndpoint(userInfoEndpointConfig -> userInfoEndpointConfig
                                .userService(customOAuth2UserService))
                );
3. 응답 데이터로 로그인
커스텀 UserDetailsService에서 응답 데이터를 받아 서비스 provider에 따라 프로세싱 후, (구글, 네이버 응답 형태가 다름)
Role 값 등을 부여하기 위해 UserDetails에 해당하는 응답 객체를 커스텀한다.
@Service
public class CustomOAuth2UserService extends DefaultOAuth2UserService {

    @Override
    public OAuth2User loadUser(OAuth2UserRequest userRequest) throws OAuth2AuthenticationException {
        OAuth2User oAuth2User = super.loadUser(userRequest);
        log.info("oAuth2User.getAttributes() = " + oAuth2User.getAttributes());

        // 구글, 네이버 응답 형태가 다르므로 OAuth2Response 라는 인터페이스를 정의하여 각자 파싱
        String registrationId = userRequest.getClientRegistration().getRegistrationId();
        OAuth2Response oAuth2Response = null;
        if (registrationId.equals("naver")) {
            oAuth2Response = new NaverResponse(oAuth2User.getAttributes());
        } else if (registrationId.equals("google")) {
            oAuth2Response = new GoogleResponse(oAuth2User.getAttributes());
        } else
            return null;

        String role = "ROLE_USER";
        /*DB 저장 로직 추가 부*/
        return new CustomOAuth2User(oAuth2Response, role);
    }
}
@RequiredArgsConstructor
public class CustomOAuth2User implements OAuth2User {
private final OAuth2Response oAuth2Response;
private final String role;
@Override
public Collection<? extends GrantedAuthority> getAuthorities() {
Collection<GrantedAuthority> authorities = new ArrayList<>();
authorities.add((GrantedAuthority) () -> role);
return authorities;
}
...
}
4. 커스텀 로그인 페이지 등록
로그인 페이지와 컨트롤러를 만들고 SecurityConfig에 등록한다.
@Bean
public SecurityFilterChain securityFilterChain(HttpSecurity http) throws Exception {

    http
            .oauth2Login(oauth2 -> oauth2
                    .loginPage("/login")
                    .userInfoEndpoint(userInfoEndpointConfig -> userInfoEndpointConfig
                            .userService(customOAuth2UserService))
            );
[심화] 실무 적용 시 : Access Token 정보 DB 저장
인증 서버에서 발급 받은 Access 토큰은 기본적으로 인메모리 방식으로 관리되는데,
소셜 로그인 사용자 수가 증가하고 서버의 스케일 아웃 문제(서버 간 공유 불가)로 인해 인메모리 방식은 실무에서 사용하지 않는다. DB에 저장하기 위해서는 OAuth2AuthorizedClientService를 직접 작성해야 한다.
※ OAuth2LoginAuthenticationFilter에서 사용되는 authorizedClientRepository의 구현체 default 값이 InMemoryOAuth2AuthorizedClientService이다.
public class OAuth2LoginAuthenticationFilter extends AbstractAuthenticationProcessingFilter {
    @Override
    public Authentication attemptAuthentication(HttpServletRequest request, HttpServletResponse response)
           throws AuthenticationException {
       ...
       //CODE를 획득하고 OAuth2LoginAuthenticationProvider를 호출
        OAuth2LoginAuthenticationToken authenticationResult = (OAuth2LoginAuthenticationToken) this
           .getAuthenticationManager()
           .authenticate(authenticationRequest);
        ...
        //access token과 리프레시 토큰 같은 인증 정보를 저장
        this.authorizedClientRepository.saveAuthorizedClient(authorizedClient, oauth2Authentication, request, response);
        return oauth2Authentication;
    }
}
구현
1. OAuth2AuthorizedClientService : JDBC 방식 구현체 등록
@Configuration
public class CustomOAuth2AuthorizedClientService {

    @Bean
    public OAuth2AuthorizedClientService oAuth2AuthorizedClientService(JdbcTemplate jdbcTemplate, ClientRegistrationRepository clientRegistrationRepository) {
        return new JdbcOAuth2AuthorizedClientService(jdbcTemplate, clientRegistrationRepository);
    }
}
※ 사전에 jdbc 의존성과 DB 테이블 셋팅 필요
CREATE TABLE oauth2_authorized_client (
client_registration_id varchar(100) NOT NULL,
principal_name varchar(200) NOT NULL,
access_token_type varchar(100) NOT NULL,
access_token_value blob NOT NULL,
access_token_issued_at timestamp NOT NULL,
access_token_expires_at timestamp NOT NULL,
access_token_scopes varchar(1000) DEFAULT NULL,
refresh_token_value blob DEFAULT NULL,
refresh_token_issued_at timestamp DEFAULT NULL,
created_at timestamp DEFAULT CURRENT_TIMESTAMP NOT NULL,
PRIMARY KEY (client_registration_id, principal_name)
);
2. ClientRegistrationRepository : 클래스를 통해 서비스 변수 등록하는 방법
위 커스텀을 진행하기 위해, application.properties 변수 설정 파일에서 설정했던 소셜 로그인 제공 서비스에 대한 정보 기입을 관련 클래스를 통해 직접 진행한다.
- ClientRegistration
서비스별 OAuth2 클라이언트의 등록 정보를 가지는 클래스 - ClientRegistrationRepository
ClientRegistration의 저장소. DB에 저장할 수도 있지만, 서비스가 구글,네이버 두 종류 뿐이므로 인메모리로 저장.
/** 서비스별 OAuth2 클라이언트의 등록 정보를 가지는 클래스 **/
@Component
public class SocialClientRegistration {

    public ClientRegistration naverClientRegistration() {

        return ClientRegistration.withRegistrationId("naver")
                .clientId("9YAErA7umLTaGhSTT_vO")
                .clientSecret("시크릿")
                .redirectUri("http://localhost:8080/login/oauth2/code/naver")
                .authorizationGrantType(AuthorizationGrantType.AUTHORIZATION_CODE)
                .scope("name", "email")
                .authorizationUri("https://nid.naver.com/oauth2.0/authorize")
                .tokenUri("https://nid.naver.com/oauth2.0/token")
                .userInfoUri("https://openapi.naver.com/v1/nid/me")
                .userNameAttributeName("response")
                .build();
    }

    public ClientRegistration googleClientRegistration() {

        return ClientRegistration.withRegistrationId("google")
                .clientId("516446395371-64et2dotprhm6570jl6115hidelokcgs.apps.googleusercontent.com")
                .clientSecret("시크릿")
                .redirectUri("http://localhost:8080/login/oauth2/code/google")
                .authorizationGrantType(AuthorizationGrantType.AUTHORIZATION_CODE)
                .scope("profile", "email")
                .authorizationUri("https://accounts.google.com/o/oauth2/v2/auth")
                .tokenUri("https://www.googleapis.com/oauth2/v4/token")
                .jwkSetUri("https://www.googleapis.com/oauth2/v3/certs")
                .issuerUri("https://accounts.google.com")
                .userInfoUri("https://www.googleapis.com/oauth2/v3/userinfo")
                .userNameAttributeName(IdTokenClaimNames.SUB)
                .build();
    }
}
@Configuration
@RequiredArgsConstructor
public class CustomClientRegistrationRepo {
private final SocialClientRegistration socialClientRegistration;
public ClientRegistrationRepository clientRegistrationRepository() {
return new InMemoryClientRegistrationRepository(socialClientRegistration.naverClientRegistration(), socialClientRegistration.googleClientRegistration());
}
}
3. 설정 등록
@Bean
public SecurityFilterChain securityFilterChain(HttpSecurity http) throws Exception {

    http
            .oauth2Login(oauth2 -> oauth2
                    .loginPage("/login")
                    .clientRegistrationRepository(clientRegistrationRepo.clientRegistrationRepository())
                    .authorizedClientService(authorizedClientService
                            .oAuth2AuthorizedClientService(jdbcTemplate, clientRegistrationRepo.clientRegistrationRepository()))
                    .userInfoEndpoint(userInfoEndpointConfig -> userInfoEndpointConfig
                            .userService(customOAuth2UserService))
            );
참고 자료 & 이미지 출처
https://www.devyummi.com/page?id=668e8bff9601715cc45a971f
개발자 유미 | 커뮤니티
www.devyummi.com
'Spring > Spring Security (feat. JWT, OAuth2)' 카테고리의 다른 글
| 스프링 OAuth2 인가/리소스 서버 (1) | 2024.11.17 |
|---|---|
| 스프링 OAuth2 Client (JWT 방식, CSR/SPA 구조) (0) | 2024.11.16 |
| 스프링 JWT 심화 (0) | 2024.11.14 |
| 스프링 시큐리티 JWT (0) | 2024.11.14 |
| 기타 : 메소드 시큐리티, 연동(웹 MVC, 타임리프, 스프링 데이터 JPA) (1) | 2024.11.10 |


